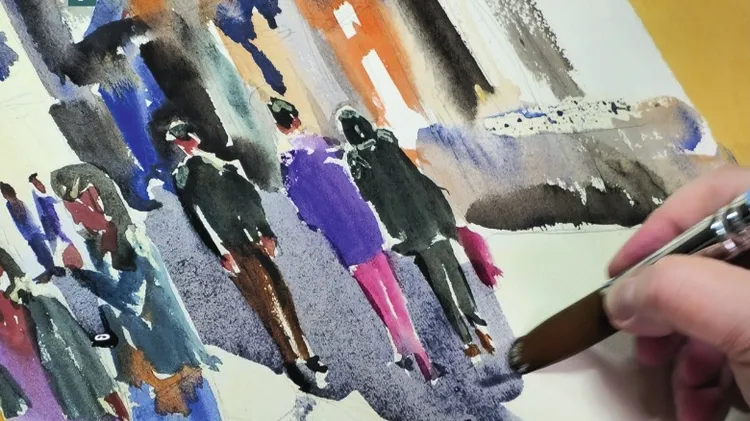
Draw a portrait using charcoal

4 min read

Charcoal

LIZET DINGEMANS shares the importance of proportions with her step-by-step workshop for measuring out and bringing detail to a charcoal drawing

courtesy of Raw Umber Studios online archive

The endless variety of the human face and features has fascinated artists throughout the ages.

When drawing a portrait, there are a wide variety of traditional drawing tools to choose from. Of these, charcoal is one of the most well-known. It’s famed for versatility in application and proximity to paint in how it’s applied.

Before we start drawing, I want to take you through basic proportions of the head. For this, I’ll be using the comparative measurement system with our reference. You do this by laying your charcoal or a measuring stick across the area you want to measure, and mark the ends with your thumb and the tip of your charcoal or measuring stick.

You can now move your hands across various areas of the drawing to see how other parts compare to the area you’ve just measured, then compare this to your reference. This way you can make your drawing as large or small as you like. As long as the measurements hold up, the drawing will work.

Pictured right is a schematic of a human head, superimposed on a photograph with some common proportions that use comparative measurements. Do note that these proportions are idealised, meaning there’s a huge amount of variety for each individual. So while these measurements and proportions are by no means one size fits all, they are a good place to start making sense of the individual differences.

There are various measurements to remember when you begin your work. When dividing the face in half, the eyes will be halfway down the skull, while the width of the head will be two-thirds of its height.

For most people, you’ll find the face divided into thirds: the bottom of the chin to bottom of the nose, bottom of the nose to top of the brow, and brow to top of the skull. The mouth can also be divided into three: bottom to top of the chin, top of the chin to bottom of the top lip, and top lip to bottom of the nose. Award-winning artist Lizet Dingemans teaches online and in-person portrait classes at Raw Umber Studios, and has been exhibited internationally. See more at www.lizetdingemans.com.

1 Tone the paper using charcoal

To tone the paper, I use the side of the charcoal, making sure I open the grain first using my sharpening block. Then I tone the whole paper, before finally blending the charcoal together in order to get rid of any texture.

2 First lines

The first step I take is measuring the big structural planes. I start off by placing the top and bottom of the block of the skull on the page, which will decide where the portrait sits and will be the main element we’ll relate all of our other meas